Firstly, the “Why” – why go to all this effort?
Well, some years ago a man named Frank Retes who will probably be familiar to some of you hit upon a great idea for providing overhead heating for small Australian monitors. He “invented” what has become known as the “Retes Stack” – it is a stack of wooden panels each raised up from the next by a smaller chunk of wood in each corner, with overhead heating positioned above it – this way the little monitors can squeeze themselves into the gaps at whichever level they like, and thus regulate the temperature they bask at, much as if they were in cracks on a cliff face.
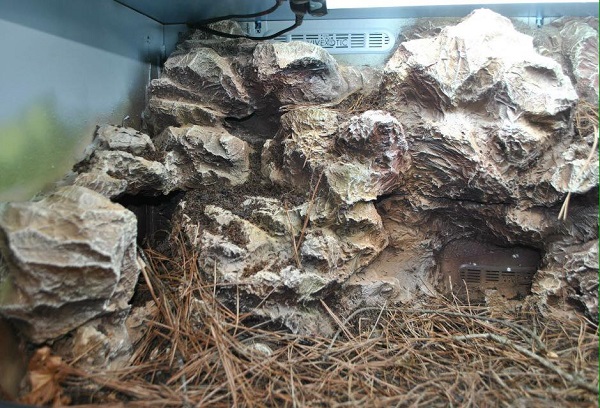
My reasoning was to take this idea one step further – not only provide the animal hiding spaces and basking spots at different heights, but also allow the animal to regulate the distance from the overhead heat and UV sources, provide hiding places, arboreal “transit routes” above the ground and thus provide a whole third dimension of usable space for the animal to traverse.
The way I decided to go about this was with fake rock walls, into which I could build hiding places or basking spots at different heights, allowing the animal greater choice on where to position itself in regard to the heat source and UV, at the same time giving it more space.
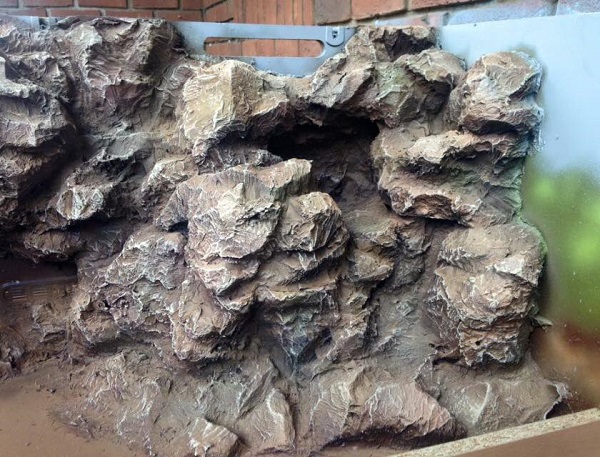
There follow a series of photos detailing how I achieved this in just one of my terraria; bear in mind there are several different ways of achieving the same end result, each with a different aesthetic and differering amounts of time and work needed, but this is one of my favourite way to get really realistic looking fake rock.
1. The Sculpt
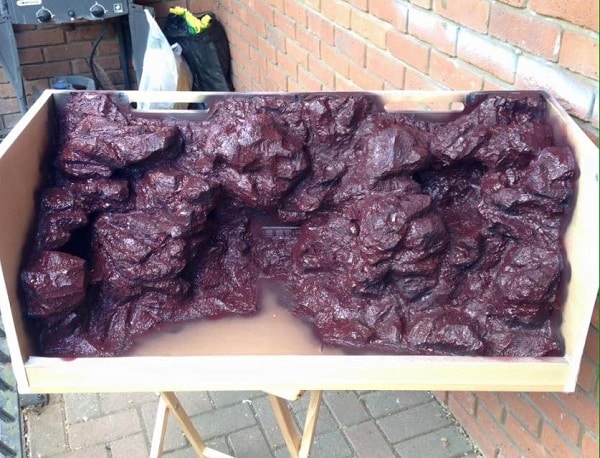
Obviously the first thing you need to do is make the rock wall. To do this I use a combination of Kingspan and Extruded Polystyrene. It is very important that you use Extruded Polystyrene rather than the regular stuff used in packaging as it is much stronger and more durable, does not disintegrate into thousands of tiny balls, will not melt when sprayed and is overall easier to work with. The basic idea is to carve chunks of the material into a rock face, building up in layers that incorporate raised basking spots and crevices for the animal to hide in.
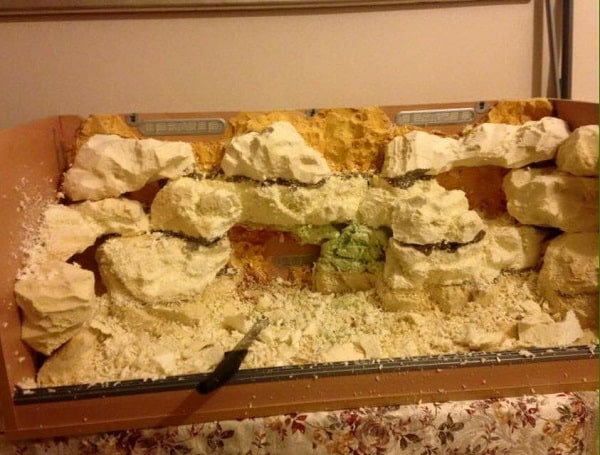
It is very important not to make the crevices too small and inaccessible, it is heartbreaking having to cut a finished rock wall apart to rescue an animal that has got stuck behind part of it! I always make sure to test the build with a thin whip snake before going any further – let it explore the whole thing and it will locate any dangerous cracks for you!
The build is held together with general purpose “Sticks Like” glue and can be strengthened with cocktail sticks and barbecue skewers.
I find the pink Kingspan is very crumbly and best for making backboards with, that cracks and texture can be scraped out of, whilst the tougher Extruded Polystyrene is best for carving chunks of rock and basking platforms. I also tend to use spray foam to fill in areas when they need it.
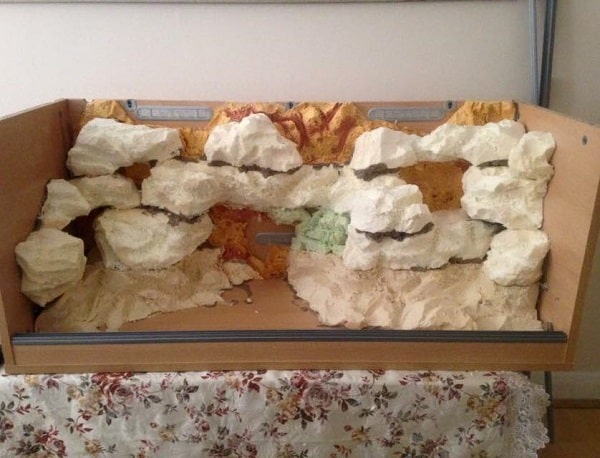
When you are satisfied you have a nice-looking build that the animal will actually be able to utilise, the time has come to seal it.
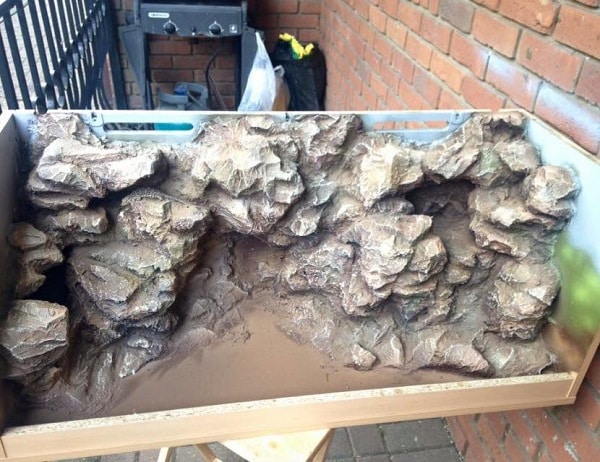
2. Sealing
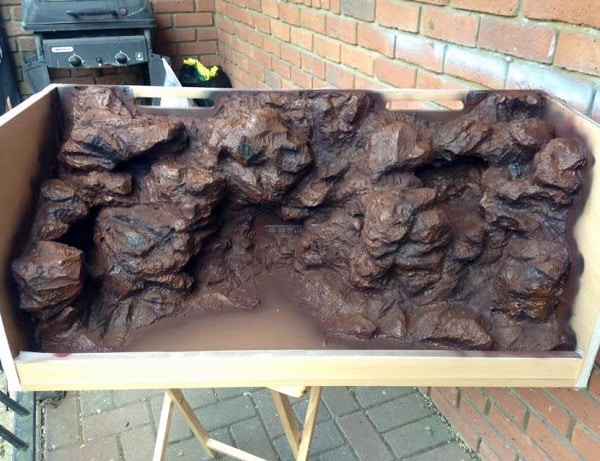
The next stage is to seal the whole thing, making it durable and resistant. In times gone by I would do this by applying 10-12 layers of outdoor grout, each of which took several hours to apply and at least a day to dry – in other words, making every project incredibly work-intensive. In return, you got a build that would crack after very little time, which lizards would easily tear pieces off and which was not actually very durable at all. So I came up with a different, much quicker and more hard-wearing, solution.
This was to paint a 50:50 mix of Outdoor Waterproof PVA onto the polystyrene sculpt, then apply a layer of ordinary, plain toilet tissue onto it. This was then daubed with more PVA:water mix. After 24-36 hours the whole thing will dry solid and considerably tougher than polystyrene or grout.It is often worth layering tissue this way several times for a really strong seal (especially for lizards which can scratch at it with their claws).
The great thing about the tissue is that you can layer it on in clumps and even extend the rocks themselves, or add more texture by sticking little wedges of tissue covered in PVA. This lets you make the rock face less linear.
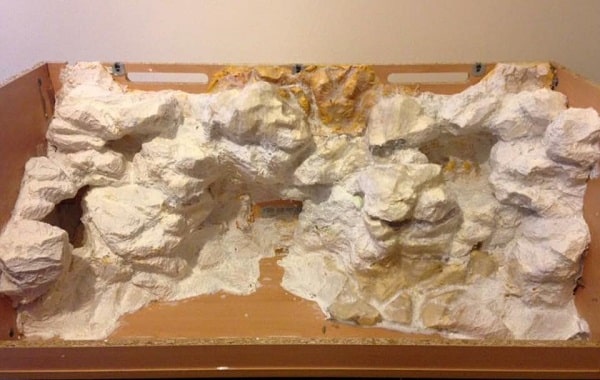
Once dry you will have a firm, solid rock sculpt and painting can begin. For humid environments, it would be worth sealing the whole thing again with something like yacht varnish to waterproof it further, but as most of my animals tend to be dry land species it is fine like this.
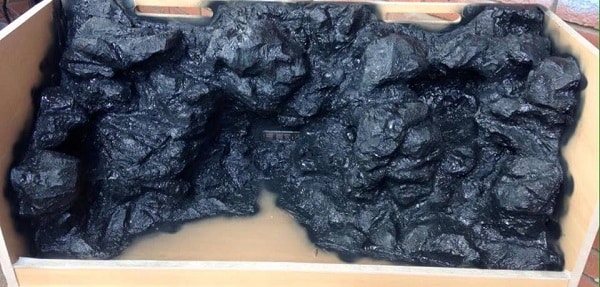
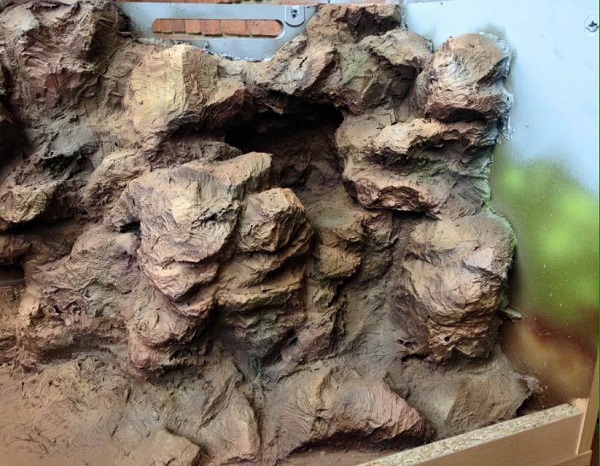
3. Undercoating
I won’t mince my words – a lot of fake rock walls I see are much better than mine, far more realistic-looking, but they fall down in the aesthetic department because of a flat, cartoonish-looking paint job. I think for aesthetic reasons alone it is worth taking some time over the painting and here is a good way of doing it quickly and easily yet still achieving a nice looking result.
The way I paint my builds is with Montana Gold spray paints. These are graffiti paints – weather proof and able to withstand extremes of hot and cold; non-toxic and available in a huge variety of colours. There is even an app that will tell you exactly what colour from the extensive range matches whatever you point your phone camera at – very useful when you want to accurately represent a particular rock type!
I work from the undercoat up, starting with darker colours and getting progressively lighter. Montana Gold paints give extremely strong coverage so you will not lose colour intensity doing this. For the rocks themselves I will generally use 5-6 different colours, building them up in layers to make a subtle finish.
My favourite undercoat colour, particularly for grey rocks, is a colour called Anthracite – a really dark grey. This the stage where it is most important to ensure you hit EVERY nook and cranny. Having shiny white patches of polystyrene showing in the recesses will spoil the whole thing.
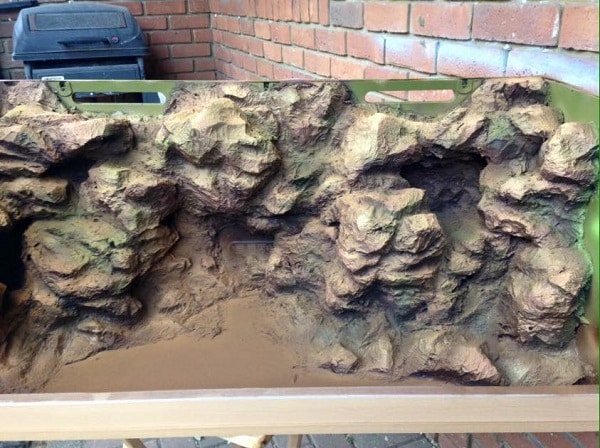
4 – Layering Up Paints
Over the undercoat it is really up to you what colours you use, although I recommend being inventive and using not just the basic “browns” or “greys” but also oranges, greens, creams and yellows when layering up. Using the Montana Gold app on various rock formations will bring up various shade and highlight colours you can use.
Above the undercoat, I next overspray a dark base coat that will set the tone for whatever colour I want – you can choose something neutral or cool (works well for stark greys or sandy browns) or go with a warm colour like the rich Wine Red I used to give this brown rock build a nice warm tone.
The key here is not to just spray the whole thing again but be judicious and leave some of the dark colour showing beneath. It is also important to spray only from one direction in each colour – either above or below, NEVER head on as that way you will fill in all the crevices and recesses; you want to spray at an angle so each colour hits only one side, leaving the other side retaining the colour beneath. It is tantamount not to spray too strongly – hold the spray can a long distance away and spray lightly, allowing the paint to fall onto your build. This will result in a less even, more natural looking coat rather than just flat, stark colour.
Once the base coat is done, you can layer up.As I said before, you do not want to go with just one type of colour – if you want a brown rock, don’t just go with various shades of brown but use reds, oranges, greys and greens. This will provide subtle richness and depth and look MUCH better than flat colours.
For example, for this particular rock build, above the Wine Red I used Cacao (the mid brown), Orange Brown (a lighter, rich brown), Dirty Apricot and Shock Orange (highlight colours) and Reed (green). If you look at the Apricot and Shock Orange on their own, you will see they are ridiculously bright, neon colours, yet they work really well as highlights if you are judicious and sparing, and only highlight from certain angles. You create further tonality by painting in striations, leaving some areas darker, and highlighting others more. Play around, but remember to only spray each colour from one direction (I like spraying orange from below and green from above) and to make sure that the lighter the colour, the further away you hold it from the build when spraying.
The Green should be used from above (algae and lichen grows where the sun hits after all) and should be the penultimate colour layered on, very sparingly. During the process, do not be afraid to “reset” the colour by going back and spraying darker colours from earlier stages into the crevices and deeper sections. Chances are you WILL make some mistakes or misjudgements, especially with the lighter colours, and it is better to go back and work up again than stay with a rock wall that is way too bright and will look garish.
The Montana Gold paints are excellent however they have one major drawback – they STINK for a few days after spraying so all painting must be done outside, and you need to leave the terrarium in a very well ventilated area for at least a week after spraying before putting the animals in.
5 – Drybrushing
Once the rock looks pretty good and has been highlighted up to the lightest colour you are using, the time has come to finish it off. This is where the real benefit of sealing the sculpt with tissue pays off, as the tissue will have dried into all kinds of interesting, natural creases and raised areas creating wonderful, rocky texture.
What you do is take a large, wide brush and dab it in a lighter colour. Cream is fine, although you can even use white for grey rocks (be VERY sparing though). In this case I used an Acrylic paint called “Sand” from WHSmith which suits my purposes brilliantly.
Once you have loaded up the brush, you wipe it dry again on cardboard or tissue. When it looks like there is no wet paint left on the brush, you swiftly draw it back and forth over the raised areas of the rock wall, and what will happen is the last remnants of paint will catch on all those cool raised surfaces, highlighting them for you. This instantly brings the whole thing to life, giving it a much more 3-D appearance.
This is the part I love best, as you see all your hard work leap out and by the end you have a rock face that looks brown, or grey, or whatever colour, but upon closer inspection you will see all kinds of other subtle colours in there so it does not look flat and cartoony – you end up with a fantastic, aesthetically pleasing rock face that provides your pet with far more options than just a flat floor and a couple of branches to climb!
6 – The Ceiling and Sides
For that finishing touch I spray the ceiling and sides of the terrarium above the rock a light grey to simulate sky. I have tried light blue, but when the lights are switched on it looks way too garish and bright and does not look “right” – I find a light blue-grey like Montana Gold colour “Wall” fits MUCH better.
I also use the same colours that I did for the rock itself to “extend” the rock along the sides and create a nice looking background. You do not have to be a good painter to do this, just a background colour with a few odd sprays of lighter colour will suffice and give a good effect.
Source
